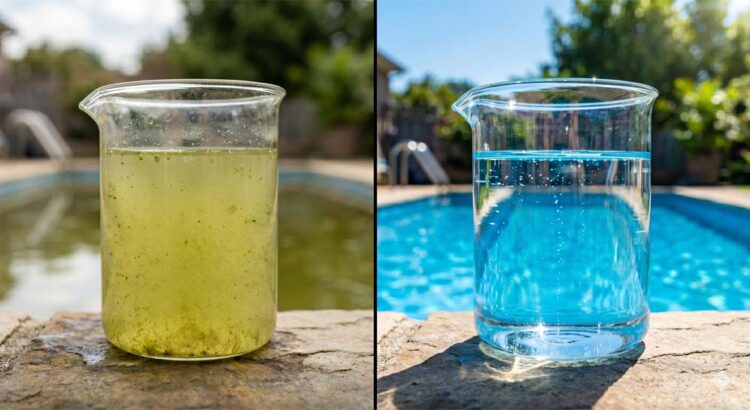
Preservatives in Soft Drinks – Types, Roles, Health Impact & FDA Regulations

Soft drinks are among the most widely consumed beverages in the world. From colas to fruit-flavored carbonated drinks, their refreshing taste and long shelf life depend heavily on preservatives. These additives play a crucial role in preventing spoilage caused by bacteria, molds, and yeasts, especially in products that travel long distances or are stored for extended periods. Without preservatives, soft drinks would spoil quickly, lose their flavor, and pose potential health risks. But what exactly are these preservatives, and are they safe for consumption? Let’s explore in detail.

Types of Preservatives Used in Soft Drinks

Preservatives in soft drinks can be broadly classified into chemical preservatives and natural preservatives. Each type has distinct functions, depending on the drink’s formulation and storage requirements.

1. Chemical Preservatives

    These are synthetic compounds designed to inhibit microbial growth and extend shelf life. Common chemical preservatives include:

    Sodium Benzoate (E211): One of the most widely used preservatives in carbonated beverages. It prevents the growth of fungi and bacteria, especially in acidic conditions (pH < 4.5).

    Potassium Sorbate (E202): Effective against molds and yeasts, often used alongside sodium benzoate for better stability.

    Sulphur Dioxide (SO₂): Primarily used in fruit-based drinks to prevent discoloration and fermentation.

    Benzoic Acid: A natural form of sodium benzoate that provides antimicrobial protection.

    2. Natural Preservatives

      With the rise of consumer demand for “clean label” beverages, some brands now use natural preservatives, such as:

      Citric Acid: Naturally found in citrus fruits; it lowers pH to create an environment hostile to microbes.

      Ascorbic Acid (Vitamin C): Acts as an antioxidant that helps preserve color and flavor.

      Rosemary Extracts and Essential Oils: Possess natural antimicrobial properties used in organic or artisanal drinks.

      Common Preservatives in Beverages

      Different types of soft drinks use different combinations of preservatives depending on their ingredients, sweetness level, and carbonation. Here’s a quick overview:

      Beverage TypeCommon Preservatives UsedPurpose
      Carbonated ColasSodium Benzoate, Phosphoric AcidPrevent microbial growth and stabilize pH
      Fruit-Flavored DrinksPotassium Sorbate, Citric AcidInhibit yeast and mold
      Energy DrinksSodium Benzoate, Ascorbic AcidMaintain freshness and prevent oxidation
      Sparkling JuicesBenzoic Acid, Sulphur DioxidePrevent spoilage and preserve flavor
      Diet DrinksPotassium Sorbate, Citric AcidPreserve sweetness stability

      Role of Preservatives in Soft Drinks

      Preservatives serve several critical functions in beverage manufacturing and storage:

      Preventing Microbial Growth: Soft drinks, especially those with fruit extracts or sugar, are prone to microbial contamination. Preservatives like sodium benzoate and potassium sorbate destroy or inhibit microorganisms, preventing spoilage.

      Maintaining Product Stability: Preservatives help maintain the drink’s taste, color, and aroma throughout its shelf life.

      Extending Shelf Life: Without preservatives, soft drinks could spoil within days of production. Preservatives extend their usability to months or even years.

      Ensuring Consumer Safety: Microbial spoilage can lead to toxins and off-flavors. Proper preservation ensures the product remains safe for consumption.

      Carbonation and Preservation

      Carbonation — the process of dissolving carbon dioxide (CO₂) gas into the beverage — also acts as a natural preservative. Here’s how carbonation enhances preservation:

      Creates an Acidic Environment: The dissolved CO₂ forms carbonic acid, lowering the pH and inhibiting bacterial growth.

      Reduces Oxygen Exposure: Carbonation minimizes oxygen inside the bottle, preventing oxidation and staling.

      Adds Pressure: The sealed carbonated environment creates pressure that discourages microbial contamination.

      However, carbonation alone cannot prevent all forms of spoilage — hence the addition of chemical or natural preservatives for complete protection.

      Shelf Life of Soft Drinks

      The shelf life of soft drinks typically ranges from 6 to 12 months, depending on the packaging, ingredients, and storage conditions. Preservatives play a major role in extending this period by controlling microbial activity. Factors affecting shelf life include:

      Acidity (pH) Level: Lower pH helps preservatives function more effectively.

      Temperature: High storage temperatures can reduce preservative efficiency.

      Light Exposure: UV light can degrade ingredients and affect preservation.

      Packaging Type: Cans and PET bottles are designed to maintain carbonation and prevent oxygen entry.

      Manufacturers conduct shelf-life studies to ensure preservatives remain effective throughout the drink’s intended lifespan.

      Microbial Stability in Beverages

      Microbial stability ensures that soft drinks remain free from contamination during production, storage, and transportation. To achieve this, manufacturers follow these steps:

      Pasteurization or Filtration: To eliminate most microorganisms before packaging.

      Acidification: Lowering the pH through citric or phosphoric acid to discourage microbial growth.

      Preservative Addition: Using sodium benzoate, potassium sorbate, or other preservatives to inhibit residual microbes.

      Aseptic Packaging: Ensuring that no contamination occurs after bottling.

      When done correctly, this combination provides both safety and long-lasting freshness.

      Are Preservatives in Soft Drinks Harmful?

      The safety of preservatives in beverages has been a long-standing debate. While preservatives are generally recognized as safe (GRAS) when used within legal limits, overconsumption or chemical interactions can pose risks. Potential Health Concerns:

      Sodium Benzoate & Vitamin C Reaction: Under certain conditions, sodium benzoate can react with ascorbic acid to form benzene, a known carcinogen. Modern manufacturing strictly controls this risk by adjusting formulations.

      Allergic Reactions: Some individuals may experience mild allergic responses to benzoates or sulfites.

      Behavioral Concerns in Children: Some studies suggest preservatives combined with artificial colors might contribute to hyperactivity in sensitive children.

      Despite these concerns, regulatory agencies maintain that preservatives are safe within specified limits.

      FDA Regulations on Preservatives in Beverages

      The U.S. Food and Drug Administration (FDA) and similar international agencies strictly regulate the use of preservatives in food and beverages.

      Key FDA guidelines include:

      Acceptable Daily Intake (ADI):

      • Sodium Benzoate: Up to 5 mg/kg of body weight per day.
      • Potassium Sorbate: Up to 25 mg/kg of body weight per day.
      • Labeling Requirements: All preservatives must be clearly listed on the product label.
      • Testing for Benzene Formation: The FDA routinely monitors beverages containing sodium benzoate and ascorbic acid for benzene traces.
      • GRAS (Generally Recognized As Safe) Status: Most preservatives used in soft drinks are classified as GRAS when used correctly.

      Manufacturers are also encouraged to minimize preservative use by improving hygiene, filtration, and packaging methods.

      Conclusion

      Preservatives are essential components in modern soft drink production. They ensure microbial safety, product stability, and long shelf life, allowing millions of consumers to enjoy their favorite beverages without spoilage. While certain preservatives have drawn criticism, scientific evidence and strict regulations ensure they remain safe within defined limits. For health-conscious consumers, preservative-free or naturally preserved beverages are now widely available — offering choice without compromising safety.

      Advantages and Disadvantages of Coagulation and Flocculation in Water Treatment

      Water is one of the most valuable resources on Earth, yet clean and safe water is not always readily available. Suspended solids, turbidity, and harmful microorganisms often contaminate natural water sources. To make water suitable for drinking, industry, and agriculture, it must be purified. Coagulation and flocculation are fundamental water and wastewater treatment processes that remove suspended solids, colloids, and other impurities. In municipal water supply, industrial effluent treatment, and even in food and beverage industries, these processes play a key role in producing clean and safe water. However, like all chemical processes, they come with both advantages and disadvantages that must be carefully considered.

      What Are Coagulation and Flocculation?

      Coagulation: The First Step

      Coagulation is a chemical water treatment process where coagulants (such as aluminum sulfate/alum, ferric chloride, or polyaluminum chloride) are added to water. These chemicals neutralize the negative charges of suspended particles and colloids, which would otherwise repel each other and remain in suspension. Once destabilized, particles start to clump together.

      Flocculation: The Second Step

      Flocculation follows coagulation. During this stage, the water is gently mixed to encourage the small destabilized particles to aggregate into larger, visible clusters known as flocs. These flocs can then settle to the bottom during sedimentation or be removed through filtration.

      Advantages and Disadvantages of Coagulation and Flocculation

      Advantages of Coagulation and Flocculation

      Effective Removal of Suspended Solids

      Coagulation and flocculation significantly reduce turbidity by binding fine particles, making the water visibly clearer. This is essential for both drinking water and industrial processes.

      Pathogen Reduction

      Coagulation and flocculation remove microorganisms like bacteria, viruses, and protozoa (Giardia, Cryptosporidium) by trapping them within flocs. This complements disinfection methods such as chlorination.

      Enhanced Filtration Efficiency

      By reducing the load of suspended matter, downstream filtration units work more effectively, extending filter life and reducing operational costs.

      Wide Industrial Applications

      Coagulation and flocculation are applicable in multiple settings like municipal water treatment, textile dye effluent removal, paper and pulp industry, mining wastewater, and food processing industry.

      Cost-Effective for Large Volumes

      Compared to advanced water purification techniques such as reverse osmosis or nanofiltration, chemical coagulation and flocculation remains relatively inexpensive, especially for large-scale treatment.

      Disadvantages of Coagulation and Flocculation

      Chemical Dependency

      The process relies heavily on chemicals (alum, ferric salts, synthetic polymers), which increases recurring operational costs and environmental concerns.

      Sludge Generation

      One of the biggest challenges is the large amounts of chemical sludge are produced, which must be treated and disposed of safely. Improper disposal can cause secondary pollution.

      pH and Alkalinity Sensitivity

      Coagulation works best at specific pH levels. In some cases, operators must adjust pH with lime or soda ash, adding complexity and expense.

      Residual Contaminants

      Excessive dosing of coagulants can leave residual aluminum, iron, or polymers in treated water, which may cause health or operational issues.

      Limited for Dissolved Substances

      Coagulation and flocculation are excellent for suspended solids but less effective for dissolved salts, pesticides, heavy metals (without specific coagulants), or organic pollutants—often requiring additional treatment steps.

      Case Studies: Coagulation and Flocculation in Action

      Case Study 1: Municipal Water Treatment in the U.S.

      Many American cities rely on alum as the primary coagulant in municipal water treatment. By combining alum with polymers, treatment plants consistently meet U.S. EPA turbidity standards (<0.3 NTU for 95% of samples), ensuring safe drinking water.

      Case Study 2: Textile Industry in Bangladesh

      Textile dye effluents are highly colored and contain toxic compounds. Coagulation with ferric chloride, followed by flocculation, has been successfully applied to remove color and suspended solids, making water safe for discharge or reuse.

      Case Study 3: Mining Industry in Australia

      Acid mine drainage is a major challenge in mining regions. Coagulation and flocculation, combined with lime neutralization, are widely used to remove heavy metals and turbidity, preventing environmental contamination.

      Conclusion

      Coagulation and flocculation remain cornerstone processes in water treatment, balancing effectiveness, affordability, and scalability. They are excellent for reducing turbidity, removing pathogens, and improving filter performance. However, challenges such as chemical dependency, sludge generation, and limited effectiveness for dissolved pollutants mean they are rarely used alone. The best results come from integrating coagulation and flocculation into a multi-barrier approach that includes sedimentation, filtration, and disinfection. This ensures a safe, sustainable water supply for communities and industries worldwide.

      FAQs About Coagulation and Flocculation

      1. What is the main difference between coagulation and flocculation?

      Coagulation is the chemical process of destabilizing particles. Whereas Flocculation is the physical process of gently mixing so particles form larger clusters (flocs).

      2. Are coagulation and flocculation safe for drinking water?

      Yes, when properly monitored. Regulatory standards ensure residual aluminum, iron, or polymers remain within safe limits.

      3. What are common coagulants used in water treatment?
      1. Alum (Aluminum sulfate)
      2. Ferric chloride
      3. Ferric sulfate
      4. Polyaluminum chloride (PAC)
      5. Synthetic and natural polymers (as coagulant aids)
      4. Can coagulation remove dissolved contaminants?

      Not effectively. Coagulation primarily targets suspended solids and colloids. For dissolved salts, pesticides, or organic pollutants, methods like reverse osmosis, activated carbon, or advanced oxidation are needed.

      5. Why is sludge disposal a problem?

      Sludge from coagulation contains concentrated metals, organics, and pathogens. If not treated properly, it can contaminate soil and water sources.

      Ammonia Buffer Solution: Everything You Need to Know

      Ammonia buffer solutions are used in a variety of industries to stabilize pH levels. In this article, we will discuss the different types of ammonia buffers and their applications. We will also look at the manufacturing process and how to properly use ammonia buffers. Keep reading to learn everything you need to know about ammonia buffer solutions!

      Types of ammonia buffers

      There are three main types of ammonia buffers: ammonium acetate, ammonium bicarbonate, and ammonium chloride. Each type of buffer has its own unique properties and applications. Ammonium acetate is the most commonly used buffer in industry because it is relatively cheap and easy to manufacture. Ammonia bicarbonate is used in food and beverage industry because it is a food-grade buffering agent. Ammonium chloride is used in pharmaceutical and medical applications due to its high solubility.

      Ammonia buffer formula

      The most common type of ammonia buffer is the ammonium bicarbonate buffer. This buffer is made by combining ammonium hydroxide and sodium bicarbonate. The ratio of these two chemicals is important to create a stable pH level. For example, a ratio of one part ammonium hydroxide to two parts sodium bicarbonate will create a buffer with a pH of about nine.

      The manufacturing process of ammonia buffers is relatively simple. First, the two chemicals are mixed together in the correct ratio. Then, the mixture is heated until it reaches a boiling point. After that, it is cooled and stored in an airtight container.

      pH level of ammonia buffer

      The pH level of ammonia buffer solutions can range from about four to ten. The most common type of ammonia buffer is the ammonium hydroxide solution, which has a pH level of around nine. This type of solution is used in many industries, including the food and beverage industry, to stabilize pH levels. Ammonium hydroxide solutions are also used in the pharmaceutical industry and in the cosmetics industry.

      There are other types of ammonia buffer solutions that can be used to stabilize pH levels. One type of solution is the ammonium chloride solution, which has a pH level of around seven. This type of solution is often used in the textile industry and in the paper industry. Another type of solution is the ammonium sulfate solution, which has a pH level of around six. This type of solution is often used in the chemical industry and in the oil and gas industry.

      Manufacturing process of ammonia buffer solutions

      The manufacturing process of ammonia buffer solutions can vary depending on the type of solution that is being made. Ammonium hydroxide solutions are typically made by combining ammonia and water. Ammonium chloride solutions are typically made by combining ammonium chloride and water. Ammonium sulfate solutions are typically made by combining ammonium sulfate and water.

      The manufacturing process of ammonia buffers involves the neutralization of acids and bases. The most common method of manufacture is the batch process, which involves adding acid or base to a solution until the desired pH is achieved. The second method is the continuous process, which uses a column containing an acidic or basic material to neutralize the solution.

      Uses

      When using an ammonia buffer, it is important to follow the directions on the label. This will ensure that the buffer is used correctly and that the pH level is maintained. Ammonia buffers should be replaced every six months to ensure that they are effective.

      Ammonia buffers are also used in many industrial applications. For example, they are often used to stabilize pH levels in water treatment plants. Ammonium bicarbonate buffers are also used in the food industry to maintain the acidity of foods.

      Ammonia buffer solution for hardness

      The hardness of water is caused by the presence of dissolved minerals, such as calcium and magnesium. When these minerals are present in high concentrations, they can cause a number of problems, including scale buildup on pipes and fixtures, decreased water quality, and even health problems.

      Ammonia buffer solutions are used to stabilize pH levels in water, which can help to reduce the hardness of the water. There are a variety of different types of ammonia buffers, each with their own advantages and disadvantages.

      The most common type of ammonia buffer is sodium bicarbonate, which is also known as baking soda. Sodium bicarbonate is relatively inexpensive and easy to find, making it a popular choice for many industries. However, sodium bicarbonate is not as effective at reducing hardness as some of the other options.

      Another type of ammonia buffer is calcium carbonate, which is also known as limestone. Calcium carbonate is more effective at reducing hardness than sodium bicarbonate, but it is also more expensive

      ##nh3 and nh4cl buffer

      ammonia buffer system

      Now that you know everything there is to know about ammonia buffer solutions, you can use them in a variety of applications. Be sure to follow the directions on the label and replace them

      RO water vs DI water, which is better for you?

      Water is an essential element of our lives and we need it for various purposes like drinking, cooking, cleaning, and more. However, not all water is created equal, and different types of water are available in the market. RO water and DI water are two popular types of purified water that are used for various purposes. In this article, we will discuss the differences between these two types of water and explore which one is better for our daily life.

      What is RO water?

      RO water is produced through a process called reverse osmosis. In this process, water is forced through a semi-permeable membrane that allows water molecules to pass through while blocking larger molecules like minerals, bacteria, and viruses. RO water is used in various applications, including drinking and cooking, as it removes impurities and contaminants from water, making it safe to consume.

      Reverse Osmosis tankless system is commonly used in homes, commercial settings, and industrial applications to purify water. These systems are effective at removing a wide range of contaminants, including lead, arsenic, fluoride, and more. They are also capable of removing harmful bacteria and viruses from water.

      Benefits of RO water

      RO water has several benefits that make it the preferred choice for drinking and cooking purposes. Some of the benefits of RO water include:

      1. Improves taste and odor

      RO water systems can improve the taste and odor of water by removing impurities that can affect the flavor. This makes it more enjoyable to drink and use for cooking.

      2. Removes harmful substances

      RO water systems can remove harmful substances like lead, arsenic, and fluoride from water. These substances can be present in tap water and can have negative health effects if consumed regularly.

      3. Retains essential minerals

      While RO water removes minerals from water during the filtration process, many systems add them back into the water to improve its taste and quality. This ensures that essential minerals like calcium and magnesium are still present in the water.

      Benefits of DI water

      DI water also has its benefits, which make it suitable for specific applications. Some of the benefits of DI water include:

      1. Removes all ions and minerals

      DI water removes all ions and minerals from water, making it free of any impurities that can affect the outcome of industrial and laboratory processes.

      2. Ensures consistency

      DI water ensures consistency in industrial and laboratory processes by providing a reliable and pure water source that does not contain any impurities or contaminants.

      3. Improves quality

      DI water can improve the quality of products by ensuring that the water used in manufacturing is pure and free of any impurities that can affect the quality of the end product.

      Is RO water the same as Deionized water?

      No, RO water is not the same as DI water. While both types of water are purified, they use different methods to remove impurities. RO water is produced by filtering water through a semi-permeable membrane, while DI water is produced by removing ions and minerals from water through an ion exchange process.

      RO water may still contain some minerals and ions, while DI water is completely free of them. However, both types of water are free of contaminants and impurities, making them safe to consume and use for various applications.

      RO water VS DI water, which is better for you daily life?

      The answer to this question depends on the intended use of the water. For drinking and cooking purposes, RO water is the better choice. RO systems are designed to remove impurities and contaminants that can affect the taste and quality of the water. They can also remove harmful substances like lead, arsenic, and fluoride, which may be present in tap water.

      Furthermore, RO water still contains some minerals that are essential for our health, such as calcium and magnesium. While these minerals are removed during the filtration process, they are often added back into the water to improve its taste and quality.

      On the other hand, DI water is not suitable for drinking because it lacks minerals that are essential for our health. In fact, drinking DI water can be harmful as it can leach minerals from our bodies and cause mineral deficiencies. However, DI water is the better choice for industrial and laboratory purposes where the absence of minerals and ions is important.

      RO and DI water both have their benefits and drawbacks, and it is important to understand their differences to make an informed decision about which one to use. For daily life, drinking and cooking, RO water is the better choice, while DI water is suitable for industrial and laboratory purposes. So for daily life water treatment, SimPure Y7P is a highly recommended product for those looking for an efficient and reliable RO water system. With its advanced filtration technology, it effectively removes impurities and contaminants from water, ensuring clean and safe drinking water for daily use. Its compact design and easy installation make it a convenient choice for any household or office.

      Conclusion

      In conclusion, RO water and DI water are two popular types of purified water that are used for various applications. RO water is the better choice for drinking and cooking purposes as it removes impurities and contaminants, improves taste and odor, removes harmful substances, and retains essential minerals. DI water, on the other hand, is suitable for industrial and laboratory purposes where the absence of minerals and ions is important.

      Both types of water have their benefits and drawbacks, and it is important to understand their differences to make an informed decision about which one to use. Ultimately, the choice of water depends on the intended use and the specific requirements of the application. By choosing the right type of water for the task at hand, you can ensure the best possible outcome and maintain optimal health and safety.

      Best automatic chlorinator for above ground pool

      Are you tired of constantly having to manually add chlorine to your above ground pool? Look no further! An automatic chlorinator is the solution you’ve been searching for. Not only does it save time and effort, but it also ensures that your pool stays properly sanitized. But with so many options on the market, how do you know which one to choose? Don’t worry – we’ve narrowed down the top choices for the best automatic chlorinator for above ground pools. Keep reading to find out which one reigns supreme!

      What are automatic chlorinators?

      Automatic chlorinators are a great way to keep your pool clean and healthy. They work by using an algorithm to detect the presence of harmful bacteria and oxidizer and then releasing chlorine until the levels fall below a preset threshold. This eliminates the need for you to regularly check the pool chlorine level, making it easier to enjoy your swimming pool all summer long!

      What are the benefits of an automatic chlorinator?

      Many people are interested in automatic chlorinators for their pools because they know that it is a very important safety feature to have. Additionally, many people believe that an automatic chlorinator will save them time and energy. Here are some of the benefits of owning an automatic chlorinator:

      -It can help keep your pool clean and safe.
      -It can save you time cleaning your pool.
      -It can save you money on pool supplies.

      How do automatic chlorinators work?

      Automatic chlorinators work by using a chemical reaction to break down the chlorine in the water. This reaction creates hypochlorous acid, which is then neutralized by the pool’s salt. This process allows for continuous chlorination of the water without having to manually add chlorine.

      There are a few different types of automatic chlorinators on the market, each with its own set of features and benefits. Some models use an electronic control panel, while others rely on gravity or pressure to maintain chlorine levels. Some also offer programming abilities so that you can customize pool chlorine levels based on swimming activity or weather conditions.

      Overall, automatic chlorinators are a convenient way to maintain consistent pool chlorine levels without having to spend time maintaining the equipment yourself.

      Which automatic chlorinator is best for me?

      There are many automatic chlorinators on the market today that can be used to keep an above ground pool clean and healthy. Choosing the best automatic chlorinator for your pool depends on a few factors, including the size of the pool, the type of automatic chlorination system you have, and your budget. Here are some tips to help you choose the best automatic chlorinator for your pool:

      If you have a small pool (<25 feet), an inline chlorine dispenser may be the best option for you. These units are smaller and more affordable than automated chlorine systems with pumps, and they use less electricity overall.

      If you have a larger pool (25-50 feet), or if you want to use an automated chlorine system with pumps, a central automated chlorine dispenser is likely the better choice. These systems are larger and more expensive than inline systems, but they’re also more powerful and efficient. They can dispense up to 40 pounds of chlorine per day, which is enough to keep most pools clean and healthy. Central automated chlorine dispensers typically require an electrical outlet, so be sure to consider your specific needs when choosing one.

      If money is no object, an all-in-one automated chlorine system with pumps may be ideal for you. These systems are very large and expensive (upwards of $10,000), but they’re capable of dispensing up to 80 pounds of chlorine per day – more than enough to keep most pools clean.

      What size automatic chlorinator do I need?

      When it comes to choosing the best automatic chlorinator for an above ground pool, size is definitely important. You obviously don’t want to overbuy, but you also don’t want to skimp on a necessary piece of equipment either.

      So what size automatic chlorinator do you need? The most common size for an automatic chlorinator for an above ground pool is 50 gallons per hour. That’s the equivalent of 750 feet per minute. So if your pool is 10 feet wide by 25 feet long, your chlorinator should be able to handle up to 375 gallons per hour.

      But if your pool is wider or longer than that, you’ll need a larger chlorinator. An automatic chlorinator that can handle 100 gallons per hour will work great for pools up to 40 feet wide by 60 feet long, and a model that can handle 150 gallons per hour will be perfect for pools up to 50 feet wide by 75 feet long.

      And finally, if your pool has a lot of plants or people in it, you’ll want to get a chlorinator with a higher capacity – like one that can handle 250 or even 500 gallons per hour. That way you can keep everything clean and safe without having to refill the tank every few hours.

      Conclusion

      If you’re looking for an automatic chlorinator that will keep your pool clean and well-maintained, we recommend the Hayward CL110. This pump is easy to operate and has a range of features that will make keeping your pool sparkling clean a breeze.

      Sodium hypochlorite swimming pool

      Summer is here, and with it comes the sweet promise of lazy afternoons spent lounging by the pool. But before you dive into those crystal-clear waters, have you considered what’s keeping them so sparkling? Enter sodium hypochlorite – a crucial component in maintaining your swimming pool’s hygiene and safety. In this blog post, we’ll delve into the world of sodium hypochlorite swimming pools to give you all the information you need for a clean and refreshing swim season. So grab your floaties and let’s jump right in!

      What is sodium hypochlorite?

      Sodium hypochlorite is a pool disinfectant and sanitizer. It is made of bleach and chlorine. Sodium hypochlorite kills bacteria, viruses, and algae by breaking down their chemical bonds.

      How does sodium hypochlorite work in a swimming pool?

      Sodium hypochlorite is a common swimming pool disinfectant. It works by breaking down organic material in the water to create chlorine. This chlorine kills bacteria and other contaminants that may be present in the water. Swimming pool sanitation is important for preventing infection and illness, so using sodium hypochlorite is a effective way to maintain cleanliness.

      What are the dangers of using sodium hypochlorite in a swimming pool?

      Sodium hypochlorite is a chemical that can be used to disinfect a swimming pool. However, using this chemical can be dangerous if not done correctly.

      When using sodium hypochlorite to disinfect a swimming pool, it is important to follow the directions on the product label. For example, you should mix the correct amount of sodium hypochlorite with water and use this solution to clean the pool surfaces. You should also keep an eye on the pH level of the pool while it is being disinfected. Too much acidity can damage the pool surface while too much alkalinity will make it difficult for the chlorine to work.

      Finally, always wear protective gear when working with sodium hypochlorite. This includes goggles, gloves, and a face mask.

      How can I keep my swimming pool safe from bacteria and mold?

      Sodium hypochlorite is a great way to keep your swimming pool safe from bacteria and mold. You can use it to sanitize the pool on a regular basis, or you can use it as a final step before closing the pool for the season.

      To use sodium hypochlorite, first make sure that the pool is empty. Then, mix 1 part chlorine gas with 9 parts water. Open the pool gate and wait until the chlorine gas has dispersed throughout the water. Swim in the pool while wearing protective clothing and eye protection. If you do not have enough chlorine gas, you can add more water to create a stronger solution.

      If you decide to use sodium hypochlorite as your only method of cleaning your pool, be sure to follow these tips:

      1) Use a strong solution – Use a strong solution of sodium hypochlorite if you only plan on using it as a final step before closing the pool for the season. A stronger solution will kill any bacteria that may be present and will also dissolve any build-up on pool surfaces.

      2) Use caution – Be careful when using this chemical; it is dangerous if it comes into contact with eyes or skin. Wear protective clothing and avoid breathing in fumes from the solution. If you see signs of poisoning (e.g., convulsions, difficulty breathing), call 911 immediately!

      3) Close the gate – Once you have used sodium hypochlor

      How long after sodium hypochlorite can you swim

      Swimming after sodium hypochlorite should not be done for at least two hours.

      Conclusion

      If you are looking to have a safe and enjoyable swimming experience, it is important to use the right swimming pool chemicals. Sodium hypochlorite is one of the most common pool disinfectants and can be used in both fresh and salt water pools. Make sure to read the label before using it so that you know how much chlorine to add, and always test the pH of your pool water before using sodium hypochlorite.

      The determination of dissolved oxygen by Winkler method

      The determination of dissolved oxygen is an important parameter in water. The Winkler Method is a common technique used to determine dissolved oxygen levels in water. This method is based on the principle that when a chemical reagent is added to a sample of water, it will react with any oxygen present in the water and produce a colored compound. The intensity of this color can be used to measure the amount of oxygen present in the sample. In this article, we will discuss the basics of the Winkler method and how it is used to detect dissolved oxygen. We will also provide some tips on how to improve your results when using this technique.

      What is the principle of Winkler’s method?

      The Winkler method is based on the principle of titration. In a typical titration, a known volume of a solution is added to a known volume of another solution. The reaction between the two solutions produces a change in color, which can be used to determine the concentrations of the original solutions.

      In the Winkler method, a known volume of water is titrated with a known volume of a standardized solution of manganese dioxide (MnO₂). The MnO₂ reacts with the dissolved oxygen in the water to form manganese oxide (MnO). The reaction between MnO₂ and dissolved oxygen is:

      MnO₂ + O₂ → MnO + H₂O

      The amount of dissolved oxygen in the water can be calculated from the volume of MnO₂ used in the titration.

      Apparatus and Reagents

      In order to carry out the Winkler method, you will need the following apparatus and reagents:

      1. A titration flask
      2. Burette or pipette
      3. A funnel
      4. A stirring rod
      5. Magnetic stirrer (optional)
      6. A source of light (for example, a lamp)
      7. A white tile

      The reagents you will need are:

      • Manganese dioxide (MnO₂)
      • Hydrochloric acid (HCl)
      • Sodium hydroxide (NaOH)
      • Ammonium chloride (NH₄Cl)
      • Potassium iodide (KI)

      You will also need distilled water or water of a known purity.

      Sampling

      In order to obtain a representative sample of the water you wish to test, it is important to follow proper sampling procedures. The United States Environmental Protection Agency (EPA) has published guidelines on how to collect a representative water sample.

      Once you have collected your sample, it is important to take the dissolved oxygen measurement as soon as possible. Dissolved oxygen levels can change rapidly, and the longer you wait to take the measurement, the less accurate it will be.

      If you are unable to take the measurement immediately, you can store the sample in an airtight container with a small amount of sodium hydroxide (NaOH) to prevent oxygen from entering the sample. Make sure to label the container clearly, and take the measurement within 24 hours.

      Preparation of the MnO₂ solution.

      The next step is to prepare a standardized solution of manganese dioxide (MnO₂). This solution will be used to titrate the water sample, and the concentration of dissolved oxygen in the water will be calculated from the volume of MnO₂ used.

      To prepare the MnO₂ solution, you will need:

      • A clean, dry bottle or flask
      • Weighing scale
      • A stirring rod
      • A funnel
      • Manganese dioxide (MnO₂)

      First, weigh out 28 grams of MnO₂ and add it to the bottle or flask. Next, add 500 mL of distilled water and stir until the MnO₂ is completely dissolved. Once the MnO₂ is dissolved, add 500 mL of hydrochloric acid (HCl) and stir.

      The MnO₂ solution is now ready to use. It can be stored in a cool, dark place for up to six months. Now that the MnO₂ solution is prepared, let’s move on to the next step:

      Preparation of the titration flask.

      The titration flask is where the water sample and MnO₂ solution will be mixed. It is important to use a clean, dry flask for this step.

      To prepare the titration flask, you will need:

      • A clean, dry 250 mL flask
      • A funnel
      • Sodium hydroxide (NaOH)
      • Ammonium chloride (NH₄Cl)
      • Potassium iodide (KI)

      First, add 50 mL of sodium hydroxide (NaOH) to the flask. Next, add 25 mL of ammonium chloride (NH₄Cl) and stir. Finally, add 0.25 grams of potassium iodide (KI) and stir until all of the reagents are dissolved.

      The titration flask is now ready to use.

      Adding the water sample to the flask.

      To do this, you will need:

      • The water sample
      • The titration flask
      • A funnel
      • A stirring rod

      First, use the funnel to add 100 mL of the water sample to the titration flask. Next, add 100 mL of the MnO₂ solution and stir.

      The water sample and MnO₂ solution are now ready to be titrated.

      Titration

      Titration is the process of adding a known volume of a solution (the titrant) to another solution until a desired endpoint is reached. In this case, the desired endpoint is the point at which the color of the mixture changes from yellow to brown.

      To titrate the mixture, you will need:

      • A burette or pipette
      • Stirring rod
      • A white tile or piece of paper
      • Sodium hydroxide (NaOH) solution

      First, fill the burette or pipette with the sodium hydroxide solution. Next, add the titrant to the mixture in the flask, stirring constantly. As you add the NaOH solution, watch for the color change from yellow to brown. When the color change occurs, stop adding the titrant and record the volume.

      The volume of sodium hydroxide solution used is equal to the dissolved oxygen content of the water sample.

      The Winkler method is a simple and efficient way to determine the dissolved oxygen content of water. It can be used in a variety of settings, and is an important tool for monitoring water quality. By following the steps outlined in this article, you can easily perform this analysis yourself.

      Procedure

      The Winkler method is carried out in four steps: acidification, oxidation, back-titration, and calculation. We will go through each step in detail below.

      Before you begin, it is important to have all of your apparatus and reagents ready. Make sure that you have everything you need, and that all of your solutions are properly labeled.

      It is also important to note that the Winkler method should be carried out in a well-ventilated area, as the MnO₂ solution can produce harmful fumes.

      Acidification

      The first step in the Winkler method is acidification. This step is necessary to ensure that all of the dissolved oxygen in the water sample is in the form of molecular oxygen (O₂), which will react with the MnO₂ solution.

      To acidify the water sample, add 20 mL of hydrochloric acid (HCl) for every liter of water. Stir the solution until the HCl is completely dissolved, then set it aside.

      Oxidation

      The next step is oxidation, in which the dissolved oxygen in the water sample is reacted with the MnO₂ solution.

      To oxidize the water sample, add a known volume of MnO₂ solution to the acidified water. The volume of MnO₂ solution you add will depend on the dissolved oxygen concentration of the water sample. A common volume to use is 50 mL of MnO₂ solution for every liter of water.

      Stir the solution gently, then set it aside in a dark place. The MnO₂ will react with the dissolved oxygen in the water to form manganese oxide (MnO). The reaction between MnO₂ and dissolved oxygen is:

      MnO₂ + O₂ → MnO + H₂O

      The MnO will precipitate out of the solution, forming a brownish-black sediment.

      Back-titration

      The third step is back-titration, in which the MnO₂ that was used to oxidize the water sample is titrated with a standard solution of sodium hydroxide (NaOH).

      To back-titrate the MnO₂, add a known volume of NaOH solution to the oxidation mixture. The volume of NaOH solution you add will depend on the volume of MnO₂ used in the oxidation step. A common ratio to use is 50 mL of NaOH solution for every 50 mL of MnO₂.

      Stir the solution gently, then set it aside in a light place. The MnO₂ will react with the NaOH to form manganese hydroxide (Mn(OH)₄), which is insoluble in water. The reaction between MnO₂ and NaOH is:

      MnO₂ + NaOH → Mn(OH)₄↓ + H₂O

      The Mn(OH)₄ will precipitate out of the solution, forming a white sediment.

      Calculation

      The final step is calculation, in which the data from the back-titration is used to determine the dissolved oxygen concentration of the water sample.

      To calculate the dissolved oxygen concentration, you will need to know the following:

      • The volume of MnO₂ used in the oxidation step (V)
      • The volume of NaOH used in the back-titration step (V₂)
      • The volume of water in the sample (V₁)

      The dissolved oxygen concentration (C) is then calculated using the following equation:

      C = V₁ x V₂ / (V x 20)

      The units for C will be in mg/L.

      Precautions

      There are a few things to keep in mind when using the Winkler method:

      • Make sure that all of your equipment is clean and free of contaminants. This will ensure that your results are accurate.
      • Be precise when measuring the amount of chemical to add to the water sample. This will help to avoid over- or under-estimating the dissolved oxygen content.
      • Titrate slowly and carefully in order to get an accurate reading.

      By following these tips, you can improve your results when using the Winkler method to determine dissolved oxygen levels. This technique is a valuable tool for environmental studies and other applications. With a little practice, you can get accurate and reliable results.

      Conclusion

      The Winkler method is a common and efficient way to determine the dissolved oxygen concentration of water. It is a simple four-step process that can be carried out in a variety of settings. With the proper apparatus and reagents, anyone can accurately measure dissolved oxygen levels using the Winkler method.

      This technique is often used in environmental studies, as it is a quick and easy way to measure dissolved oxygen levels in water. It can also be used in other settings, such as in the brewing of beer or wine.

      how long does liquid chlorine last in a pool

      Are you tired of constantly adding liquid chlorine to your pool and wondering how long it will last? Look no further, as we dive into the science behind the lifespan of liquid chlorine in your pool. From factors like sunlight exposure, water temperature, and pH levels, we’ll answer all your burning questions about keeping your pool sparkly clean without having to continuously add chemicals. So sit back, grab a cold drink and let’s get started!

      How to use liquid chlorine

      Liquid chlorine is a common way to treat swimming pools. It kills bacteria and other organisms that can cause water problems. You should use liquid chlorine every week to keep your pool clean and safe. Follow these tips to use liquid chlorine safely:

      1. Always read the product label before using liquid chlorine. Some products have a shorter shelf life than others, so be sure to check the expiration date.

      2. Use fresh liquid chlorine each time you treat your pool. Old or contaminated liquid chlorine can harm your pool equipment and filter system.

      3. Follow the dosage instructions on the product label. Liquid chlorine is highly concentrated, so be sure to use the correct amount for each treatment.

      4. Make sure your pool is properly heated before treating it with liquid chlorine. Cold water can slow down the reaction of the chlorine in the product, which could lead to less effective treatment results.

      How to test chlorine levels

      Testing chlorine levels in a pool is an important part of keeping it healthy and safe. Pool operators should test the chlorine level every day, and make any necessary changes to the chlorine level or chemical mix as soon as symptoms of low chlorine are noticed. Chlorine levels will start to drop when it’s humid outside, so testing on a consistent schedule will help you be prepared for any potential problems.

      To test for chlorine:
      1) Fill a bucket with water and add 8 drops of chlorine tablet
      2) Swirl the water around to mix the chlorine and tablet
      3) Let the water sit for one minute
      4) Test the water using a chlorinator or colorimeter

      How to make a chlorine水 solution

      To make a chlorine solution, add 1 part chlorine to 9 parts water. The chlorine will break down into chloride and hydrogen gas, which will combine with oxygen in the water to create hypochlorous acid. This acid will kill any bacteria or other organism that is present in the pool. To keep your chlorine solution fresh, regularly add more water to the mix.

      How long does liquid chlorine last in a pool?

      Liquid chlorine is a type of chlorine that is in liquid form. Liquid chlorine is most commonly found in swimming pools, but it can also be used to clean other types of surfaces.

      Liquid chlorine typically lasts for around 6 hours in a swimming pool. However, the lifespan of liquid chlorine will vary depending on the conditions in which it is used, including the temperature and pH levels of the water.

      How often should I add liquid chlorine to my pool

      Adding liquid chlorine to a pool is one of the most important steps you can take for keeping it clean. Chlorine will kill bacteria, algae and other contaminants that may be present in your pool. To maintain healthy swimming conditions, add chlorine every week, or as needed.

      best liquid chlorine for swimming pools

      Adding liquid chlorine to a swimming pool is one of the first steps in keeping it clean. However, over time, the liquid chlorine will start to lose its effectiveness. In order to ensure that your swimming pool is always clean and safe, it is important to check the chlorine level every week and replace the liquid chlorine as needed.

      The chart below shows how long different brands of liquid chlorine last in a swimming pool:

      Brand (oz) Chlorine (ppm) Active Ingredient Max Use Time Blue Moon (118 oz) 1.5 50 2 weeks Clear Water (118 oz) 1.5 50 2 weeks E-Z Pool Chlorine (118 oz) 0.7 33 7 days Genesis (118 oz) 1.25 50 14 days Hayward Pool Chemicals (118 oz) 1 25 3 weeks Hydrogen Peroxide 40% (1 gal.) 4 200 10 days Kool-Aid 108 oz 0.8 12 7 days L&M Pool Solutions 118 oz 0.67 33 7 days Morpheus 88 oz 0.7 33 7 days Nemo Pool Products 118 oz 0.67 33 7 days POOL DURA-TEK® 1 gal./0.83 lt.(128 fl oz/4 liter) 0–0–50 N/A Pool Safe® Liquid Chlorine Granules 1 gal./0 .83 lt.(128 fl oz/4 liter), 0–0–50 N/A RELAX ‘

      liquid vs tablet chlorine

      Swimming pool maintenance can be a daunting task for any pool owner, especially when it comes to choosing the right type of chlorine. There are two popular options available in the market today – liquid and tablet chlorine. While both have their advantages, understanding the differences between them is crucial to make an informed decision. In this blog post, we’ll take a deep dive into the world of liquid vs tablet chlorine so you can choose which one works best for your swimming pool needs!

      What are the benefits of using chlorine tablets or liquid?

      Chlorine tablets or liquid are the most common type of chlorine used in pools and spas. Chlorine tablets create a foggy environment that helps to control bacteria. Liquid chlorine is also easier to use because you can add it directly to the pool or spa water. One downside to using chlorine tablets is that they can be hard to find in some areas. Liquid chlorine is available at most pool supply stores.

      How much liquid chlorine is equal to a tablet

      Liquid chlorine is typically diluted with water before being used, whereas tablets are usually sold as a single dose. One tablet of liquid chlorine can be equivalent to about four cups of water.

      Is liquid chlorine better than tablets

      Liquid chlorine is typically considered to be a better option than tablets because it is more convenient and easier to use. Liquid chlorine can also be poured directly into water reservoirs, saving time and energy. Additionally, liquid chlorine is less expensive than tablets, and it is also easier to store and transport.

      However, there are some disadvantages to using liquid chlorine. First, liquid chlorine can be less effective at killing bacteria than tablets. Second, liquid chlorine may cause toxic fumes if it is mishandled or if it reacts with other chemicals. Finally, liquid chlorine may not be effective against some types of bacteria.

      Is liquid chlorine more cost-effective than tablets

      Liquid chlorine is more cost-effective than tablets when it comes to treating water. Liquid chlorine can be poured into a pot and boiled, which makes it more convenient and faster to use. Tablets require that the chlorine be mixed with other ingredients, which can make the treatment process more complicated.

      What is the disadvantage of liquid chlorine

      Liquid chlorine is cheaper to use than tablet chlorine, but there are some disadvantages. Liquid chlorine can be less effective at killing bacteria and odors, which could lead to poor indoor air quality. Furthermore, liquid chlorine can be hazardous if it leaks or is spilled.

      Can I use liquid chlorine and tablets at the same time

      Liquid chlorine is a more effective treatment for bacteria than tablets. Liquid chlorine will kill more bacteria because it can travel further into the water supply. Tablets are effective against bacteria, but they leave a mineral odor and residue in the water.

      To use liquid chlorine safely, follow these instructions:

      1) Fill your sprayer with cold water and add 1 cup of liquid chlorine to it. Be sure to shake the sprayer well before using it.

      2) Aim the sprayer at a spot near the surface of the water. Hold the trigger down until you hear a sizzle and see foam start to form. Let go of the trigger and wait two seconds before spraying again.

      3) Spray continuously for three minutes, then let the water cool before using it.

      Tablets work well as an alternate treatment for small outbreaks of bacteria, but they need to be used more often (every day or every other day) and they produce a stronger smell and residue in the water.

      Conclusion

      Whether you are using liquid chlorine or tablet chlorine, always be sure to read the product label and follow the directions carefully. Each type of chlorine has its own specific uses and precautions, so it is important to understand how each one works before using them. Additionally, keep in mind that different objects will react differently to each type of chlorine – for example, metal surfaces will corrode faster if treated with tablet chlorine than if treated with liquid chlorine. Always consult a professional if you have any doubts about how to use a particular product safely.

      How do i use liquid chlorine in my pool

      Liquid chlorine is a type of chlorine that is in liquid form. It is often used to treat swimming pools. Liquid chlorine is easier to use than other types of chlorine and it does not require special equipment. In this blog post, we’ll guide you through everything you need to know about using liquid chlorine for a healthy and beautiful swimming experience.

      How do i use liquid chlorine in my pool

      What is Liquid Chlorine?

      Liquid chlorine is a chemical compound used as a swimming pool sanitizer and disinfectant. It is highly effective in killing bacteria, viruses, and algae in pool water, making it a popular choice for pool maintenance.

      In addition to its use as a pool sanitizer, liquid chlorine is also used in other applications, such as water treatment, wastewater treatment, and as a disinfectant in the food and beverage industry. It is a powerful oxidizer that works by releasing hypochlorous acid and hypochlorite ions into the water, which penetrate and destroy microorganisms by breaking down the proteins and enzymes they need to survive.

      How Does Liquid Chlorine Work?

      Liquid chlorine is a highly effective pool sanitizer that works by oxidizing and killing microorganisms such as bacteria, viruses, and algae in the water. When added to the pool, liquid chlorine releases hypochlorous acid (HOCl) and hypochlorite ions (OCl-) into the water, which are the active sanitizing agents.

      Hypochlorous acid is a strong oxidizer that penetrates the cell walls of microorganisms and destroys them by reacting with and destroying the proteins and enzymes they need to survive. Hypochlorite ions, on the other hand, work to prevent the formation of algae and other organic matter in the pool water by oxidizing them and breaking them down.

      In summary, liquid chlorine is a powerful pool sanitizer that works by oxidizing and destroying microorganisms in the water, as well as by preventing the formation of organic matter. It is an important component of pool maintenance and should be used according to manufacturer instructions and in conjunction with regular water testing and pH level monitoring.

      What are the Advantages of Liquid Chlorine?

      There are many advantages to using liquid chlorine in your pool, such as:

      1. Liquid chlorine is a fast acting acid that breaks down organic material such as algae, bacteria, and sediment.
      2. It leaves your pool clear and sparkling.
      3. Liquid chlorine is easy to use and can be added directly to the pool without the need for additional equipment or complicated procedures.
      4. Compared to other types of pool sanitizers, such as tablets or granules, liquid chlorine is often less expensive and more readily available.
      5. It works quickly to sanitize the pool water, so you can enjoy your pool sooner after adding it.
      6. Liquid chlorine can help to stabilize the pH level of the pool water, preventing it from becoming too acidic or alkaline.
      7. Liquid chlorine can be used in various types of pools, including saltwater and chlorine-based pools.

      Overall, liquid chlorine is an effective, convenient, and cost-effective option for sanitizing your pool and keeping it clean and safe for swimmers.

      Disadvantages of Liquid Chlorine

      While liquid chlorine has many advantages as a pool sanitizer, there are also some potential disadvantages to consider:

      1. Safety concerns: Liquid chlorine is a strong chemical that can cause skin, eye, and respiratory irritation if not handled properly. It is important to follow safety guidelines and wear protective gear when handling liquid chlorine.
      2. Corrosive properties: Liquid chlorine is highly corrosive and can damage pool equipment and surfaces if not used correctly. It is important to dilute liquid chlorine before adding it to the pool and to distribute it evenly to prevent localized damage.
      3. pH levels: Adding liquid chlorine to the pool water can raise the pH level, which can lead to other water balance problems if not properly monitored and adjusted.
      4. Storage: Liquid chlorine must be stored in a cool, dry place away from sunlight and heat sources. Improper storage can cause the liquid chlorine to lose its strength and effectiveness over time.
      5. Environmental impact: Improper disposal of liquid chlorine can harm the environment, so it is important to follow proper disposal guidelines and regulations.
      6. Short shelf life: Liquid chlorine has a relatively short shelf life, so it must be used within a certain time frame after purchase to maintain its effectiveness.

      Overall, while liquid chlorine is an effective and popular pool sanitizer, it is important to understand and address its potential disadvantages to ensure safe and effective pool maintenance.

      How to Use Liquid Chlorine in a Pool

      Using liquid chlorine to sanitize your pool is a straightforward process, but it’s important to follow safety guidelines and manufacturer instructions. Here are the general steps for using liquid chlorine in your pool:

      1. Test your pool water: Before adding any chemicals to your pool, test the water to determine the current levels of chlorine and pH. You can use a test kit or test strips to do this.
      2. Determine the appropriate dosage: The amount of liquid chlorine you need to add will depend on the size of your pool, the current chlorine levels, and the manufacturer’s instructions. Consult the label on the liquid chlorine container or speak with a pool professional for guidance.
      3. Dilute the liquid chlorine: Liquid chlorine is very concentrated and should be diluted before adding it to your pool. You can do this by adding the liquid chlorine to a bucket of water and then pouring the mixture into the pool.
      4. Add the liquid chlorine: Slowly pour the diluted liquid chlorine into the pool while the pump and filter are running. Be sure to distribute the liquid chlorine evenly throughout the pool.
      5. Wait and retest: After adding liquid chlorine, wait several hours or until the next day and then test the water again to ensure the chlorine and pH levels are within the appropriate range. If needed, repeat the process until you achieve the desired levels.
      6. Handle and store the chlorine safely: Liquid chlorine can be dangerous if not handled properly. Always wear protective gloves and goggles when handling it, and store it in a cool, dry place away from sunlight and heat sources.

      Remember, proper pool maintenance requires consistent monitoring and testing of chlorine and pH levels. Consult with a pool professional if you have any questions or concerns about using liquid chlorine or maintaining your pool.

      where to buy liquid chlorine for swimming pool

      If you are looking to buy liquid chlorine for swimming pool use, there are a few options available. You can purchase liquid chlorine in local pool supply stores, hardware stores, home improvement stores. You can also purchase it from online retailers such as Amazon or Walmart.

      Conclusion

      Liquid chlorine is an important part of keeping your pool clean and healthy. By following these simple steps, you can easily use liquid chlorine in your pool to maintain its sparkling condition. Remember to always read the label before using any swimming pool product, as some contain chemicals that may not be safe for children or pets. Thanks for reading!